|
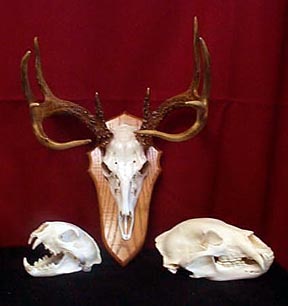
CLEANING SKULLS & OTHER
BONES
These instructions are for those of you that, for
whatever reasons, want to clean your own bear or deer
skull or any other bones. It may be for a school
project, it may be because you want to save some money
or it may be just for fun. For that last group,
let me say it is
NOT fun, it is smelly, hot and more work than you
think. I no longer
clean skulls myself, I send my skull cleaning jobs to a
specialist.
NOTE :Potential record book skulls should NOT be cleaned
by this
method. They may be damaged or shrink.
Record book skulls
should be cleaned by professionals ONLY - using beetles
or by maceration
.
I have heard all the "old timer"
ways to clean a skull - stake it on an ant hill, toss it
on the garage roof, wedge
it in the fork of a tree and so on. And given
enough time, 5 years
+, many of these methods will work to a degree.
The fact is that
ants will only eat the meat fresh, maggots only eat
softened, spoiled meat
and certain beetle larva will eventually clean up the
dried tissue.
But if you want a WHITE, clean skull in a reasonable
amount of time, you
need to either pay someone who knows what they are doing
or follow these
directions.
Let me add a disclaimer right
here. These instructions are
provided at your own risk, no promise is made or
implied. If you are the type of person that refuses to
read & follow instructions, if you lack common
sense around fire, chemicals
& sharp objects, if you are prone to sue somebody
else for the stupid
things you do, then leave this web page &
pay someone
to clean your skull. That being said,
let's go.
Getting Started
If you have a fresh skull, begin by
cleaning
as much of the meat as possible from the skull.
Remove the tongue & tissue from the lower jaw &
separate it from the skull, clean out
the brain cavity & remove the eyeballs. You
are now ready to
either freeze the skull or begin the cleaning
process. If the skull
was frozen intact, then thaw it, clean the meat &
tissue as described
above and begin. These instructions are intended
for the cleaning
of a bear skull. If you have an antlered or horned
animal, I have
tried to explain anything different you need to do
First you will
need:
A nice warm day with a breeze blowing towards a
neighbor you dislike (the smell of boiling bones is not
nice and I recommend you do it outside) You will
also need:
- A large metal pot big enough to completely submerge
the skull
- A heat source, i.e. a stove, outdoor grill or
smoker (gas
is easier to control), gas weed torch, etc.
- Washing soda (sodium carbonate) available at
most grocery stores - sold as a laundry detergent
booster
- Small wire brush
- A pair of OLD barbecue tongs, gloves & a heavy
apron
- Small knife with a stiff blade
- Small stiff wires (or ask your dentist for his used
dental picks)
- A work table, newspaper & soap &
water
- An air compressor is helpful
Place the pot on your heat source and
crank it up to get the water boiling. Add a
handful (1/2 cup) of washing soda for each gallon of
water. When the water begins to boil, reduce the
heat to a simmer (just barely bubbling) and put in the
skull. For
deer or other antlered skulls, keep the antlers out of
the water.
For horned animals (sheep, goats & antelope),
submerge the entire skull. The horns MUST come off
the cores and then the skull & horns cleaned
separately. This is not easy on sheep
Allow the skull to boil for 5
minutes or so, use the tongs and lift the skull out of
the water. If the meat has started to peel away
from the bone, then use the knife to scrape & the
wire brush & start cleaning. When you
have removed all
the meat that will come off easily, put it back in the
water and allow it
to boil some more. Repeat this process as
needed. Use the wires
& picks to clean out ALL the holes, veins &
tissue in the nooks &
crannies. Pay close attention to the lower jaw, the
brain cavity &
the nasal passages. It is important to remove all tissue
from the skull or
it will begin to smell. HOWEVER, in order to keep
the skull from starting
to fall apart, you want to boil it for the shortest time
& at the lowest heat possible. Some teeth may
become loose or come out. I recommend you remove
the teeth, clean the base or root & and lay them out
to dry in their proper order (or position in the mouth),
much like a dental chart.
When you have removed all the tissue
you can,
leave the skull someplace outside where it is out of
direct sun, like
a garage or an old ice chest. You want the skull
to stay moist
and you want flies to be able to get to it. If you
have missed any
organic tissue, the flies will find it and in a day or
so, maggots will
begin feeding on what you missed. It may begin to
smell, but this
is OK - they will soften the remaining tissue in places
you may not be able
to reach. After a few days, boil the skull again
in clean water with
washing soda. This should remove any maggots and
remaining tissue.
Use the air compressor & a blow gun nozzle to flush
out the brain cavity
& the veins. Scrub the skull with soap &
water and allow it
to air dry.
Degreasing the Skull
You will need:
- enough white gas (Coleman lantern fuel) to submerge
the bones. Other solvents may also work such as
- dry cleaning solvent, acetone
or auto parts cleaning solvent.
Follow all manufactures precautions when using these
products -
most are highly flammable. Completely cover the
bones (except the
teeth) & allow them to soak overnight - 12 hours or
so. Then remove
them and let then air dry in the sun. Clean the
teeth with the solvent one at a time using an old
tooth brush. Place them on a clean paper towel in
their proper order.
Submerge the horns on goats, etc. for
12 hours or so, then remove and allow to dry.
After a few days, or when the skull is
thoroughly dry, glue the teeth back into position
using a small amount of
super glue on each tooth. Allow the glue to
completely dry before
beginning the bleaching process.
Bleaching
More properly called "Whitening"
since no bleach is used. Using common household
bleach will damage the bones & cause the them to
flake. To get the bones really white, I use the
following materials:
- 40% Hydrogen peroxide - This is NOT the 3%
stuff you
buy at the drug store. This is used by beauty
shops to strip the
color from your hair. You can buy it as
Clairoxide 40 at beauty
supply houses. Click here for New Information
- Magnesium Carbonate about 1/2 lb. (Another
Clairol product called Basic White may be used
instead, but I have not used it.)
- Dust respirator - to cover your nose &
mouth
- Rubber gloves - dishwashing type that covers your
forearms
- Eye protection - safety glasses
Again, put on your safety equipment,
use your
common sense and follow manufacturers safety
precautions. In a plastic container, mix the about
1/2 cup of Hydrogen peroxide with the Mag.
Carbonate until a thick paste is formed. Brush it
all over the skull. I use a wire to hang the skull
to dry. If you can, hang it in the
sun. Place something under the bones to catch any
drips. On
antlered skulls - DO NOT get it on the rack.
When the skull has dried, put on your
dust respirator, and brush the flakes off the
skull. The powder can be saved &
re-used. Rinse the remaining powder off under
running water and place it in the sun to dry
again. Now you can put on a finish if you
want.
Finishing
Now is the time to attach horns back to
the skull on goats, sheep & antelope. I cut off
at least half of the core (the part that goes up into the
horn), then wash both the inside of the horn & the
core with acetone. Dry both parts. I like to
use a 2- part liquid foam to secure the horns to the
skull. You can purchase this at most hobby
shops. Test fit the horn and when it is in the
proper placement, drill a small hole thru the horn and
core. Find a wire or small nail that will fit
snuggly in the hole, then remove the core. Mix only
enough foam to do one horn at a time. Pour it into
the horn, quickly roll it around to coat the inside, then
slide the
horn onto the remaining core. Slip the wire thru the
pre-drilled hole
and allow the foam to finish expanding. When it has
not quite fully
hardened, cut off any excess foam and use acetone to clean
any foam off
the horn. Repeat for the other horn.
Another method that also works
and is a
little less expensive is Bondo Glass. This is
Bondo brand
body putty with fiberglass mixed in and is very strong
with good adhesion. Follow the instructions above,
except use a small putty knife or stick to coat the inside
of the core with the bondo.
While it is not necessary to put any
finish on the skull, it is recommended if it will be
handled. Bone is porous and if handled enough, will
absorb grease & oils from hands. I spray mine
with a non yellowing clear satin finish like Krylon or
Envirotex. You can get these at an art supply house
and most paint or hardware stores. Floor wax is also
used by some, but I have not tried it, so you're on your
own if you want to use it.
THAT'S IT !! Your done. Now don't you wish you
had just paid the money and had somebody else do
it? (Want to check the price? - CLICK HERE)
Because some of these materials are hard to find or only
available in
bulk, I have assembled a kit with enough materials to
clean several skulls.
Each kit contains instructions & enough washing
soda, peroxide, &
mag. carbonate to do 3 average (bear or deer size)
skulls. You will
need to provide all safety equipment, degreasing solvent
and tools. For those of you that are
interested in purchasing one of these kits -
please send me an e-mail with the word "skull cleaning
kit": in the subject
line.
|
After doing some research, the
Clairoxide 40 mentioned above is not a 40%
peroxide solution, but is the
strongest over the counter peroxide
you can buy. This
is the exact same peroxide I have used in
my shop for years with good
results. It is still almost 3
times as strong as the stuff you can buy
at the grocery store. If you have
done a good job of cleaning the skull, it
will whiten them just fine. I have
found 2 sources for stronger peroxide
(35%), but you will have to order it
directly from the company.
I am no longer selling the skull cleaning
kits, but you can order one from the
companies below.
|
RESOURCES
KITS - VAN
DYKE'S TAXIDERMY SUPPLY OR
RESEARCH
MANNIKINS
BULK SUPPLIES
VAN
DYKE'S TAXIDERMY SUPPLY
RESEARCH MANNIKINS - HYDRO
PEROXIDE MAG CARBONATE
SODIUM
CARBONATE
|