All images and text on this site are the product of my
own hard work and no image or text may be copied without my express written
consent. Don't be one of those lame taxidermists that tries to fool
potential customers by passing the work of others off as your own.
Have some pride & learn to do quality work of your own
TROPHY CARE
From the field to the Taxidermist - here's what you
need to know for each type of mount you have.
|
|
|
GENERAL INFO |
|
|
|
SMALL. & MED. |
- LARGE |
FREEZING |
FULL MOUNTS |
BASIC RULES |
It never fails that each year I see
several beautiful trophy animals ruined due to improper handling in the
field. With a little knowledge, many of these mistakes could be prevented.
The purpose of this section is to help you get your trophy animal to your
taxidermist in the best possible condition. Proper field care, and
knowing what NOT to do, is a big part of making your mount look it's absolute
best.
1. Carefully examine
the fish for damage and determine the best or "show" side.
2. Take a good
35 mm color photo. Avoid bright sun and flash photos (too much glare).
3. Keep the
fish alive or get it cold. If putting the fish in a cooler, keep the "show"
side up
AND PUT NOTHING ON TOP OF THE FISH. This is very important
to keep the fish
from getting
blotchy. No ice, no cans, no other fish - NOTHING on top of
the fish!
4. If you cannot
bring the fish in to the taxidermist right away, then you must freeze the
fish.
Wrap the fish in clean, wet rags or paper towels, then place in a plastic
bag (garbage bags work)
Taking care to keep the fish as flat as possible, place it in a freezer.
If you are in a back country situation where freezing may not be possible, or a fisherman who practices catch & release, you may want to have a reproduction of your fish done, instead of a skin mount.
1. Measure the length
from the nose to tip of the tail. Fan, or spread, the tail when
measuring
2. Measure the
girth (circumference) of the fish around the belly
3. Weigh the
fish, if possible.
4. Note the
sex of the fish (when possible) and whether or not it is spawning.
This is most
important for members of the trout & salmon family.
5. Take several
good quality color photos of the fish. 35 mm pictures are best,
NO flash photos
and avoid bright sunlight (too much glare).
6. Release the
fish (or fillet it).
Birds are very easy to care for in the
field. First, you must determine if the bird is good enough to mount.
Many birds brought in each year, particularly waterfowl, are not fully feathered
enough to make a good mount. Check for pin feathers by gently
lifting backwards and looking for feathers that are not fully grown.
The back of the neck, the top of the head, the rump and the side feathers
are the areas where pin or blood feathers are the most common. Look
also at the size of the bird compared to other birds of the same species.
Older, more mature birds are generally larger.
Check to see how badly hit your
bird was. If it has large holes, wing feathers shot or broken off
or more than just a few pellets in the head area, it is probably in too
poor of a condition to mount. If you are in doubt, bring the bird
in to your taxidermist so that he/she can check it for themselves.
Assuming that you have a well
feathered bird that you did not shoot up,
1. Rinse or
wipe as much blood off the feathers as you can.
2. Place a piece
of toilet paper, or other absorbent material, in the birds mouth to help
absorb fluids.
3. Tuck the
head under or next to the wing and place the bird head first in a plastic
bag.
4. Keep the
bird as cool as you can and bring in as soon as possible OR place
in a freezer.
5. Turkeys and
other large birds may need to be field dressed in order to keep them from
spoiling.
Make a short incision from the vent to the base of the rib cage.
Remove the entrails and rinse the cavity with water, then place ice inside
the cavity.
Place in a cooler or bring in ASAP.
Handle the bird carefully and try and
avoid anything that might stain or break the feathers.
Birds may also be frozen and shipped
via UPS if you live a distance away. Please call before shipping
for complete instructions on packing and the proper paper work to enclose.
There are several different ways you
may choose to mount a mammal and each way requires slightly different
handling in the field. You may choose to do a full body mount.
This is most common for small mammals (like mink and squirrels) and
medium mammals (like foxes & raccoons). Bear, deer and other big
game animals can also be mounted as full body mounts, but because of the
size, they require different field care than small & medium mammals.
Bear are the animal most
often made into a rug, but bobcats, coyotes and foxes also make a beautiful
rug. Field care is very similar for any animal you want to make
into a rug. Half or 3/4 body mounts are also very popular for bear,
but can be done for other animals as well.
Gameheads or full shoulder mounts
is the most popular way to display many trophy animals. Deer and
other horned and antlered are most often mounted this way.
1. Whenever possible,
bring it in fresh for the taxidermist to skin.
2. NEVER SLIT THE
THROAT OF ANY ANIMAL !
3. When field
dressing any animal, always make your cuts with the sharp edge of the
knife UP.
4. When field
dressing ANY animal that you want to have as a FULL BODY
MOUNT ,
you must leave his/her genitals and bung hole attached. DO
NOT cut these off.
5. If you must
skin the animal yourself, make as few cuts as possible.
6. Do not drag
the animal unless you place something under it to protect the hide.
7. NEVER hang or
drag any animal by the neck! This damages the hide and stretches the
neck.
Hang any animal with the head down and drag out by the antlers or front
legs.
8. Place tags
carefully in the hide, doing as little damage as possible.
9. Keep every
animal as COLD as possible and bring in as SOON as possible.
10. DO NOT SALT any
animal unless it's head (and feet) are completely skinned and fleshed
Freeze or keep cold any hide that is not fully prepared.
No matter how you plan to mount your
SMALL or MEDIUM mammal, up to the size of a coyote,
the field care I recommend is the same.
1. Check for
damage. Head damage is particularly difficult to repair, so are
very large holes.
If you feel the animal is mountable, then.....
2. Place in
a plastic bag. Most small & med. mammals carry fleas,
lice or ticks. If you have some
bug killer, like RAID, spray the animal down before putting it in the
bag.
3. Bring the
animal in fresh or place in your freezer.
DO NOT GUT or SKIN unless the weather is
very warm and you have no access to ice. This is especially true
if you want a full body mount,
many measurements are needed from the carcass.
4. If you must
field dress the animal, then a make a cut from the bung hole up the center
of the
belly to the ribs. Do not cut past the rib cage. Remove the
entrails. Do not remove the
testicles, penis or bung hole.
5. Fill the
cavity with ice and bring in as soon as possible.
If you bring in your small mammal whole,
I can look it over and help you choose the best way to mount your mammal.
Full body mounts and rugs are the most common choices, but there are some
other interesting options.
Mammals can also be shipped via
UPS if they are frozen first. Call before shipping to be sure you
enclose the proper paper work.
Due to their size, most big game animals require field dressing
and skinning to make them easier to transport and to prevent the meat
from spoiling. Follow the Basic Rules above
when field dressing.
Before skinning the animal, determine what type of
mount you want to have done - rug, full or 1/2 body mount or shoulder
mount. Take your time, keep your knife sharp and use a TAPE MEASURE.
Skinning an animal for a rug is the simplest method of all. Take a look at the diagram.
1. Make the usual cut down the center of the belly to the anus and field dress the animal.
3. Starting from behind the front pad, make a cut down the inside of the front leg across the chest down the opposite leg to the base of other front pad. See fig. 1
4. Make a similar cut from just inside the heel of the rear pad, across the inside of the rear leg, across the belly. Continue up the inside of the other, ending at the heel of the other foot.
5. Begin skinning, taking care not to cut any holes. Lift and pull the hide away from the meat as you skin.
6. Cut thru the wrist and ankle joints by cutting the tendons. Leave the feet attached to the hide.
7. If it is possible to hang the animal by the rear hocks, this will make skinning the rest of the animal easier. If not, roll the animal on it's side as you skin. Then lay roll it onto the other side to complete the job.
8. When you reach the skull, carefully cut thru the meat until you reach the backbone and separate the skull from the neck. Or use a bone saw and cut thru the spine.
9. I do not recommend
that you skin out the feet or the head. DO NOT SALT THE HIDE. Salt
only works if the head and feet are skinned and all the fat is removed
from the hide.
10. If you have a freezer
or access to one, fold the hide up, place in a heavy plastic bag, and
freeze.
Click here for freezing instructions
11. If you have no freezer
and the daytime temperature is above 50 degrees, keep the hide as cool
as possible and take it ASAP to a taxidermist processing.
Or
full shoulder mounts, are the most popular way for most people to display
their trophy animal.
For local customers, once the animal is field dressed
and properly registered, I encourage you to bring in the WHOLE fresh animal.
I will gladly remove the cape at no extra charge. I do this for
a couple reasons. First, when you see where to make the cuts and measure
the neck, you will do a better job if you ever have to cape another animal
yourself. Second, by caping the animal myself, I know the cape is
not cut short and I eliminate any extra holes that are often cut in the hide
by inexperienced skinners. Third, I can get several fresh
& accurate neck measurements which helps me get the proper size form
for your animal. And since I take a limited number of gameheads each
year, if you wait to bring in your deer, I may be booked up already.
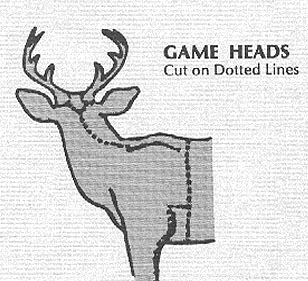
However, the following diagram
and instructions should help you if you are in a situation where you have
to skin the animal yourself.
If the animal is too large to hang by the hind legs (elk, moose),
then make the cuts on one side of the body and skin it as far as you can.
Then lay the hide back over the meat, and roll the animal over.
Make the remaining cuts and finishing skinning to the back of the skull.
2. Make a cut up the back of the neck from the base of the skull to the first cut behind the shoulder
3. Make a cut up the back of the front leg to the point where the leg meets the body. Then bring the cut over to meet the first cut. DO NOT CUT INSIDE THE FRONT LEG.
4. Cut around the front legs, just above the knee.
5. Lift and pull the hide toward the head as you begin skinning. Be careful in the "armpit" area not to cut any holes.
6. Continue skinning until you are at the back of the skull, then stop.
7. Using a cloth
tape measure, (or a boot lace if you forgot the tape) measure around
the neck, behind the ears and under the jaw. Measure on the meat,
not on the hide, at the smallest point
8. Make a second measurement 3" down the neck, on the meat, parallel to the first measurement
9. Separate the skull from the neck, fold the hide flesh side to flesh side and place in a plastic bag to keep from drying out. DO NOT SALT THE SKIN !! Salt should be used only after the cape is fully processed or it will prevent the hide from freezing properly and create excess fluid which can cause the hide to spoil faster.
10. If you are still unsure about where to measure, leave at least 6" of neck attached to the skull and bring it in. The head and cape may also be frozen now and brought in later. Keep in a cool, dark place like an unheated garage or a spare refrigerator. You must bring the head into a taxidermist immediately if the temperature is above 60 degrees and within 2 days if the temperature is above 45 degrees or you need to freeze it. The hair will begin to "slip" if it is not frozen or processed soon after skinning. Follow the instructions for freezing mammals.
The following instructions are to be followed only
if you are in a back country situation or a drop camp,
the weather is warm and you do not have access to
refrigeration.
11. Measure from the nose to the
inside corner of the eye only if you must remove the entire cape from the
skull. To do this, make a cut from the base of the skull to the base
of each antler or horn. Carefully cut and pry the skin from around the antler,
then cut thru the ear cartilage as close to the skull as you can. Continue
skinning forward until you reach the back of the eye. Put your hand
under the cape & stick your finger in the eye socket. Then
lift the skin & eyelid away from the skull as you carefully cut thru
on the flesh side. DO NOT CUT OFF THE EYELIDS ! At the front
of the eye, many animals have a deep gland. When you reach the front
of the eye, cut towards the bone and continue pulling on the cape.
The next area is the rear corner of the mouth. Cut thru here and
separate the skin from the bone where it meets the teeth. When you
reach the nose cartilage, cut straight down. Cut along the bone
until the hide is completely off the skull. Now freeze the skin
or ice it down, unless you are very experienced in processing capes.
DO NOT SALT !!! Salt will only work if the nose cartilage
is split, the lip skin is split, the ears are turned and the entire hide
is carefully fleshed.
Mammals such as deer, sheep, goats and
bear that you want as a full body mount need extra care and attention in
the field.
First, field dress the animal in the usual manner,
EXCEPT - keep the cut as short as possible and do not remove the genitals
or the anal opening. Make your initial cut to the side of the genitals
and next to the anus. To prevent fluid from getting on the meat
- tie them off under the skin.
If you are familiar with a dorsal
or back incision, this is the way I prefer to mount lifesize mammals.
You may find it awkward and difficult to do in the field if you are not
accustomed to skinning an animal this way. Below are drawings of the three
most common ways of skinning an animal for a lifesize mount.
#1 is a modified version of the
rug skinning method
#2 is the "short cut " method
using shorter incisions on the legs. This method is preferred over
splitting the legs completely
#3 is the dorsal or back incision.
This method is the easiest to sew up and is the least likely to show any
stitches
If your trophy is an antlered animal, you will also need to make a short "Y" incision from each antler and slightly down the back of the neck. See Gameheads. Follow all other instructions when skinning. You will also need to take the following measurements
After skinning, the hide should kept on ice until processed
by a professional taxidermist or frozen until you can get it to the taxidermist
of your choice. Follow these instructions for freezing
1. Wrap the face with a wet towel.
Be sure to cover the nose and ears. Use more than one towel if needed.
Place a heavy plastic bag over the towel, squeeze as much air out of
the bag as you can and use tape to keep it in place.
2. For deer or other horned or antlered
animals, wrap each ear with a separate wet towel and place a plastic bag
over each ear. Then wrap the face from the bases and over the nose
with another wet towel.
3. Wrap each foot and the tail
(except the tail on bear) in a wet towel and place a plastic bag over
each one.
4. If the animal is skinned, fold
the skin flesh side to flesh side and fold or roll it up. Now place the
entire animal or skin into a heavy plastic bag. I prefer Hefty Steel
Sacks - they are the most durable and the most difficult to puncture.
If the animal has horns, allow them to stick out of the bag if possible.
5. Get as much air as possible
out of the bag and tie or seal it shut. Seal the bag around the
bases of antlers with tape. You need to keep as much air out of the
bag as you can.
Now place the animal in a freezer near the bottom, if possible,
so it freezes quickly. Wrapped like this, it will be in fine shape
for several months and should cause no problems for any taxidermist you choose
to bring it to.